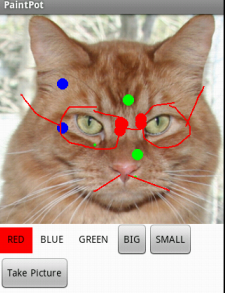
Build the PaintPot app
Build a Paint app that lets you draw lines and circles on any picture, including one you take with the camera. You'll learn about Canvases, reacting to the user's touch, and working with color and background properties.
These lessons come from USF Professor David Wolber's AppInventor.org - A great resource for learning App Inventor.
They are copied here simply because YouTube is blocked at our school.
|
Steps: (watch the video for each lesson and follow along)
|
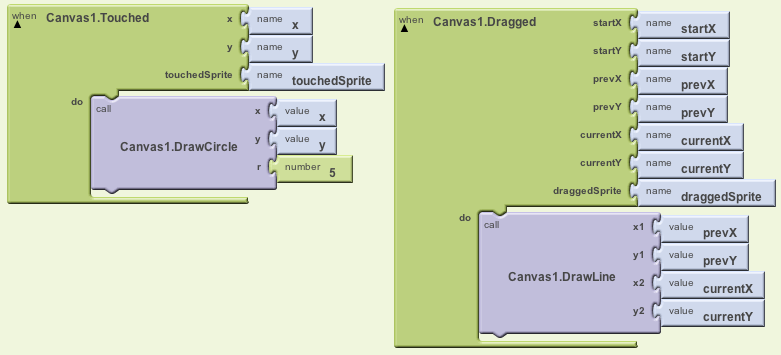
Part 1: When user touches, draw a circle. When user drags, draw a line
On Canvas.Touched, call Canvas.DrawCircle. On Canvas.Dragged, call Canvas.DrawLine
Watch the video and follow along. Any code/settings can be also found below the video.
> Go to http://beta.appinventor.mit.edu/ to begin.
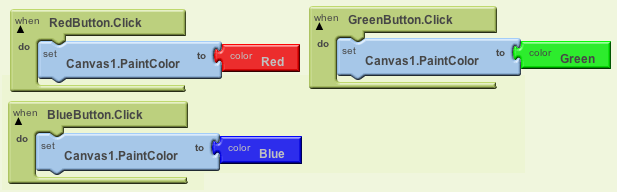
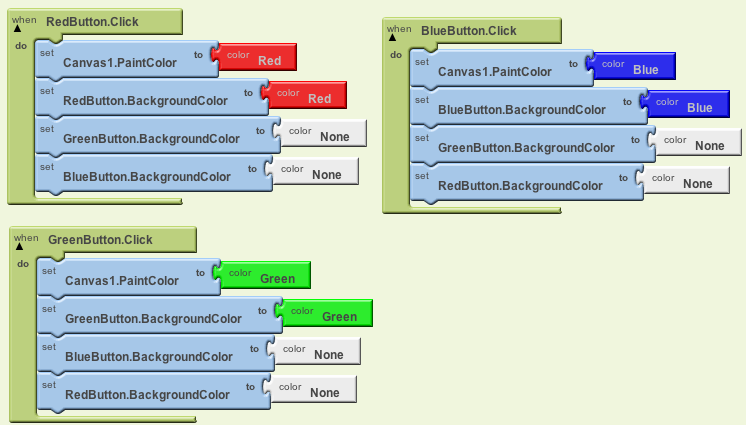
Part 2: Add menu items that let user draw in different colors
Drag in three buttons, one for each color. On the click events, change the Canvas.PaintColor
Watch the video and follow along. Any code/settings can be also found below the video.
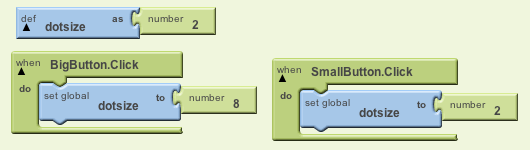
Part 3: Add menu items that let user draw different size circles
Add buttons for each size (e.g., 2 and 8) and define a variable dotSize. When clicked, set dotsize to the right value. Use dotSize when you DrawCircle.
Watch the video and follow along. Any code/settings can be also found below the video.
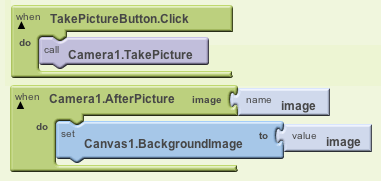
Part 4: Let the user use camera to set background picture
Drag in a Camera component and set the Canvas Background image on Camera.AfterPictureWatch the video and follow along. Any code/settings can be also found below the video.
Watch the video and follow along. Any code/settings can be also found below the video.
Part 5: Add feedback for the user interface
When each color button is clicked, changes its color and other button's color so user knows what is selected.
Watch the video and follow along. Any code/settings can be also found below the video.
Challenges
Do after completing the videos:
- MANDATORY (-30 if missing): Add an additional color with a button like the others
- OPTIONAL: Add a button to save the picture drawn
HINT: Look at the functions for the canvas
- OPTIONAL: Add a button to erase the drawing on the picture
HINT: Use a second canvas to store the original picture (either the camera pic or the cat). Set the main canvas to the second canvas' picture to perform an erase
Comments (0)
You don't have permission to comment on this page.